
BCM Field Guide · For General Contractors
The Glazing Schedule and Site Readiness Manual
How glazing moves from award to close-in, why guaranteed dimensions change everything, and what the site needs before a crew mobilizes.
Version 1.0 · October 2026
Chapter 1How to use this manual
This manual is for the project managers and superintendents who build glazing into a project schedule and get the site ready for it. It follows the work from award to close-in: the stages of a glazing schedule, the dimension decision that drives them, site readiness, the pre-install meeting, envelope sequencing, shop glazing, and RFIs.
Each chapter expands one or more posts in our BCM Field Guide series on LinkedIn. The forms in this manual are free to download, with no sign-up. Use them on any project, with any glazing contractor. Our companion Glazing Buyout Manual covers leveling bids and closing scope gaps before award.
The short version. Glazing is a chain: each stage waits on the last. Glass is not the long-lead item; opening dimensions are. Guarantee dimensions where you can, so frames are built and glass is ordered while the openings are still going in. Turn submittals quickly. Have the site ready before the crew arrives, and settle access, laydown, sequence, and contacts in writing at a pre-install meeting.
Basis and limits This manual is general guidance from a commercial glazing contractor. Timelines are illustrative; real durations depend on the system, the project, and current lead times. The contract documents, the project schedule, the manufacturer’s instructions, and the project safety plan govern.
Chapter 2Award to install: the stages of a glazing scheduleField Guide No. 09
Glazing is a chain: each stage waits on the last. A late submittal or an unready opening moves every stage after it, and fabrication time does not shrink to catch up.
The stages
- Award and kickoff. Contract, insurance, and a kickoff meeting between the general contractor and the glazing contractor. A clear scope and a named contact on both sides set up everything that follows.
- Submittals. Shop drawings, product data, samples, and calculations where delegated design applies make up the submittal package. Shop drawings are prepared during the submittal period; they do not take time out of the installation window. Quick review turnaround keeps the job moving.
- Material release. Approved submittals release framing materials for order. Finish samples and glass samples may need approval before those items can be ordered.
- Dimensions. Frames and glass are built to opening dimensions. They are either guaranteed by the general contractor or field verified once the openings are built. Chapter 3 covers the difference.
- Fabrication and delivery. Framing is fabricated and glass is made to order, then shipped to the site in the sequence of installation.
- Installation. With approved drawings, known dimensions, and a ready site, the install can proceed without stops.
- Sealing, testing, and close-in. Perimeter sealant goes in, a third-party testing agency performs any specified field testing while the work is still accessible, and the building is closed in for interior trades.
The critical path
Three items usually set the glazing end date:
- Submittal approval. Every week of review is a week of material that can’t be ordered.
- Framing material lead times, including any special finish.
- The date opening dimensions are locked in, by guarantee or by field verification.
Track those three first. Glass is not the long-lead item; what holds it up is that it can’t be ordered until dimensions are known.
How to recover time
- Turn submittals quickly. Plan design-team review time into the schedule from the start, and push for prompt turnaround on resubmittals.
- Guarantee opening dimensions where you can. It moves frame fabrication and glass ordering ahead of the openings.
- If dimensions must be field verified, keep openings ready and tell the glazing contractor the moment an area is ready to measure.
- Ask what can run in parallel. Some elevations can be guaranteed while others are verified. Some systems can be shop glazed while the openings are built (Chapter 7).
Chapter 3Guaranteed or field-verified dimensionsField Guide No. 09
This is the single biggest schedule decision in the glazing scope, and it belongs to the general contractor.
Field-verified dimensions
With field-verified dimensions, the glazing contractor measures each opening after it is built, then fabricates frames and orders glass to those measurements. Framing material is frequently ordered and sitting in the glazing contractor’s shop, waiting for openings to be ready to measure. The date the openings are ready to field verify drives everything after it.
Guaranteed dimensions
With guaranteed dimensions, the general contractor commits that openings will be built to the dimensions on the approved shop drawings (or an agreed opening schedule), within agreed tolerances. The glazing contractor builds frames and orders glass right away, usually before the openings are even ready. Installation starts as soon as openings are complete, and the building can close in significantly earlier.
Guaranteed dimensions are always preferred.
What a guarantee needs
- A basis: the approved shop drawings, with date and revision, or an opening schedule listing each opening’s mark, location, width, height, and whether the dimension is rough or finished.
- Tolerances: the width and height tolerance, plumb and level, and the allowable difference between diagonals, agreed for the project.
- A remedy: what happens if an opening is built outside tolerance. Typically the general contractor corrects the opening or covers the resulting rework, remake, and schedule impact, as agreed in writing.
- Signatures from both parties.
Use the Guaranteed Opening Dimensions Form
Free tool · Fillable PDF
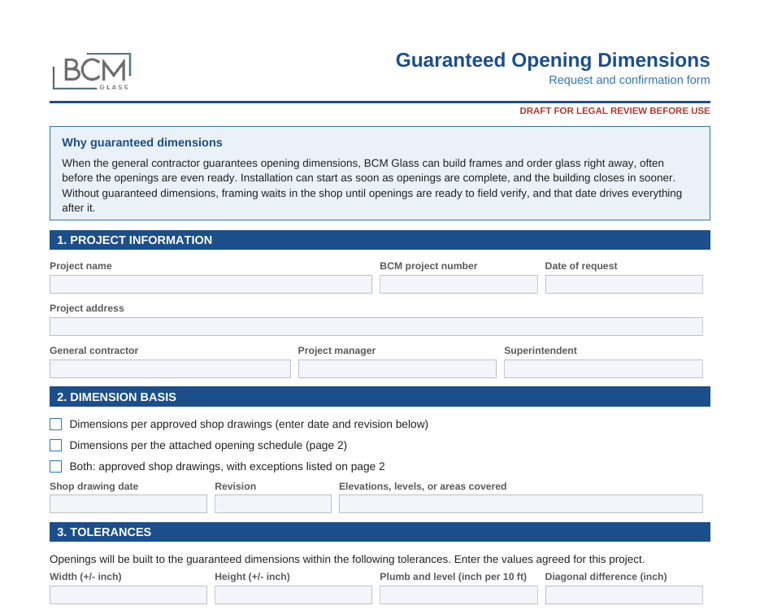
Guaranteed Opening Dimensions Form
Record the dimension basis, the agreed tolerances, and both parties’ signatures, with a 25-line opening schedule on page 2.
How to use it, step by step:
- Download the form and open it in a PDF reader that supports forms, such as Adobe Acrobat Reader. Type directly into the shaded fields.
- Section 1, Project information: enter the project name, project number, date of request, address, general contractor, project manager, and superintendent.
- Section 2, Dimension basis: check one box: approved shop drawings, the opening schedule on page 2, or both (shop drawings with exceptions listed on page 2). Enter the shop drawing date, revision, and the elevations, levels, or areas covered.
- Section 3, Tolerances: enter the agreed width and height tolerances (plus or minus, in inches), plumb and level (inches per 10 feet), and the allowable diagonal difference.
- Page 2, Opening schedule: if you are guaranteeing by schedule, or listing exceptions, enter each opening by the mark on the shop drawings, with its location (elevation, level, grid), width, height, rough or finished, drawing reference, and notes. Add pages as needed.
- Section 4, Guarantee: read it together. It states that openings will be built to the dimensions and tolerances stated, that frames and glass will be fabricated without field verification, and what happens if an opening is built outside tolerance. The form supplements and does not replace the subcontract.
- Section 5, Signatures: the general contractor and the glazing contractor each sign and date. Keep the signed copy with the subcontract.
- Put the date in the schedule. The signature date is when fabrication and glass ordering can start for the areas covered.
Basis and limits The form supplements the subcontract and does not replace it. Have your own counsel review it against your subcontract terms.
Chapter 4Ready for glazing: what the site needsField Guide No. 04
A glazing crew can only move as fast as the site allows. Glazing delays most often come from openings, access, or adjacent work that isn’t ready yet.
Openings and barrier
Openings complete. Framing, blocking, and embeds in place and built to dimension. With guaranteed dimensions, the frames are already built and waiting; with field verification, the glazing contractor measures as soon as openings are complete.
Air and water barrier ready. Rough openings prepared so the glazing system can tie into the building’s air and water barrier in the right sequence. The barrier is typically installed and inspected at openings before glazing.
Tolerances
Out-of-plumb or out-of-square openings are the most common field surprise. Agree on tolerance limits early, ideally at buyout, and check openings against them before the crew mobilizes.
Access and laydown
Access to the work. A clear path for lifts, hoisting, or scaffold along the elevations being worked, coordinated with other trades sharing that space.
Protected laydown. A flat, dry area to stage glass and framing close to the work, out of traffic and protected from damage. Glass stored on site needs to be kept dry, supported correctly, and out of direct sun when it is crated or stacked, following the fabricator’s storage instructions.
Adjacent trades, power, and lighting
Adjacent trades coordinated. Slab edge work, fireproofing, and interior finishes sequenced so the glazing crew is not installing around open work or tearing out finished work.
Power and lighting. Temporary power and adequate lighting at the work areas, especially as winter days get shorter.
If the site is not ready
Crews stand by, framing sits in the shop waiting on verified dimensions, and the building closes in later. Tell the glazing contractor early so the schedule can be reset instead of absorbed.
Use the Site Readiness Checklist
Free tool · Fillable PDF
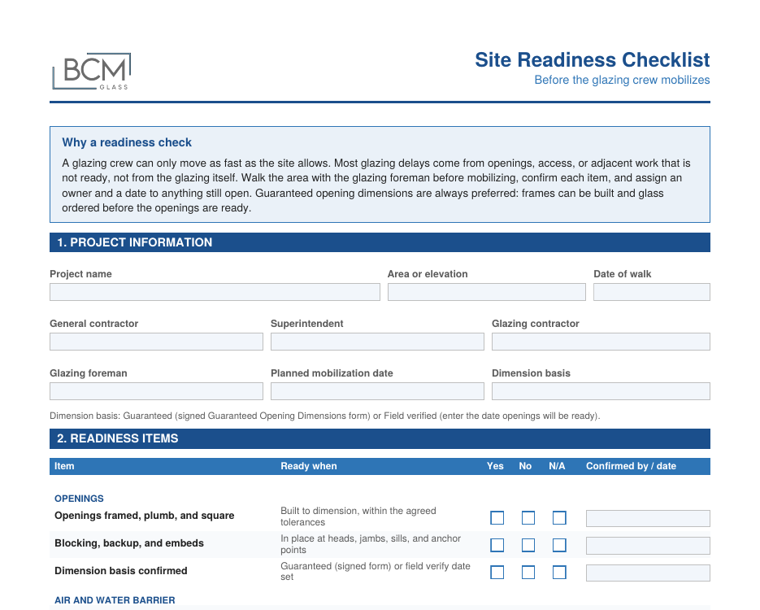
Site Readiness Checklist
Walk the area with the glazing foreman before mobilizing. Seventeen readiness items with Yes, No, and N/A boxes, an open items list, and sign-off by both parties.
How to use it, step by step:
- Schedule a walk of the area to be glazed with your superintendent and the glazing foreman, about a week before the planned mobilization date, so there is time to fix what is not ready.
- Section 1, Project information: enter the project, the area or elevation, the date of the walk, the people involved, the planned mobilization date, and the dimension basis (guaranteed, or field verified with the date openings will be ready).
- Section 2, Readiness items: for each item, check Yes, No, or N/A, and record who confirmed it and when. The “Ready when” column states what ready means.
- Section 3, Open items: list every item checked No, with an owner and a due date.
- Section 4, Walked and confirmed by: both parties sign.
- Decide on mobilization. If open items will not close before the planned date, reset the date together rather than mobilizing into a site that is not ready.
- Repeat for each area or elevation as the work moves around the building.
| Item | Ready when | Usually confirmed by |
|---|---|---|
| Openings | Framed, plumb, and to dimension | Superintendent and glazing foreman |
| Air and water barrier | Installed and inspected at openings | General contractor and envelope trade |
| Access | Lift or scaffold in place | General contractor |
| Laydown | Flat, dry, and protected | General contractor |
| Adjacent trades | Slab edge and fireproofing done or sequenced | General contractor |
| Power and light | Temporary power and lighting at work areas | General contractor |
Chapter 5The pre-install meetingField Guide No. 13
Most field problems trace back to something nobody agreed on before the crew arrived: access, laydown, sequence, or who to call. A short meeting settles them in writing.
What to settle
- Scope and sequence: walk the elevations and agree on the order of work, area by area.
- Opening dimensions: confirm whether dimensions are guaranteed. If not, set the date openings will be ready to field verify.
- Submittals and releases: confirm approved submittals, framing release, and when glass can be ordered.
- Access and hoisting: lifts, scaffold, cranes, or hoists: who provides them and when they are available.
- Laydown and deliveries: staging location, protection, delivery windows, and who receives material.
- Site rules and safety: orientation, site-specific requirements, and how the crew’s daily hazard review fits the site safety plan.
- Adjacent trades: who is working near the openings, and what has to finish first.
- Testing and inspections: mockup status and coordination with the third-party testing agency for field testing.
- Contacts and communication: the superintendent, foreman, and project managers, and how issues and RFIs will flow.
- Open items: every remaining question, each with an owner and a date.
Who should attend
The general contractor’s superintendent and project manager, the glazing contractor’s foreman and project manager, and anyone whose work touches the openings, such as the envelope, electrical, fireproofing, and hardware trades.
Send minutes
Send written minutes within a day or two, to everyone who attended and everyone affected. Decisions that live only in a conversation get forgotten.
Use the Pre-Install Meeting Agenda and Minutes
Free tool · Fillable PDF
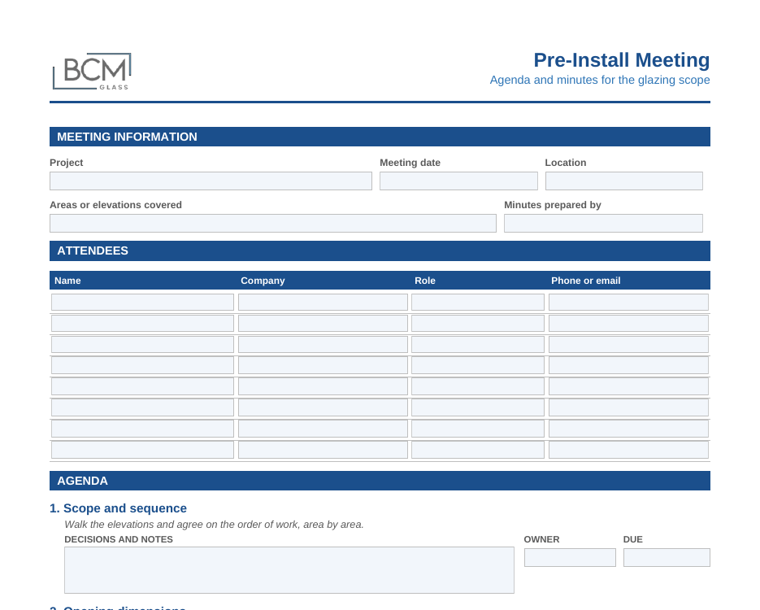
Pre-Install Meeting Agenda and Minutes
A ten-item agenda for the glazing scope, with space for decisions, owners, and due dates under each item, an attendee list, an action item log, and a distribution record. One document serves as both the agenda and the minutes.
How to use it, step by step:
- Before the meeting, fill in the meeting information (project, date, location, areas or elevations covered, and who is preparing the minutes) and send the blank agenda to attendees so they come prepared.
- At the meeting, record attendees with name, company, role, and phone or email.
- Work through the ten agenda items in order. Under each, record the decisions and notes, the owner, and the due date. For item 2, check Guaranteed or Field verify, and enter the date openings will be ready.
- Log action items on page 3 with a number, the action, the owner, the due date, and the status.
- Distribute the completed form as the minutes within a day or two, and record who it was sent to and the date in the Distribution section.
- Update the action item status at each weekly meeting until every item is closed.
Chapter 6Sequencing the envelopeField Guide No. 17
Doing envelope work out of order means tearing out or working around finished work. Getting the sequence right protects the schedule and the quality of the building.
The sequence
- Structure and openings. Openings framed, plumb, and built to dimension.
- Air and water barrier. The barrier goes on first and has to be ready to tie into the glazing.
- Lock in dimensions. Guaranteed, or field verified on the finished openings, before frames and glass are made.
- Install the glazing. Frames, glass, and gaskets or sealant go in with access, laydown, and weather conditions in place.
- Seal and test. Perimeter sealant goes in, and a third-party testing agency performs any specified field water tests (commonly under AAMA 503, using ASTM E1105) while the work is still accessible.
- Protect and close in. Once the building is closed in, interior trades can work. Protect the glass through the rest of construction.
Guaranteed dimensions change the order
With guaranteed dimensions, step 3 moves up. Frames are built and glass is ordered while the structure and barrier are still going in, so installation starts as soon as openings are ready and the building closes in sooner.
Common clashes
- Fireproofing and slab edge work blocking glazing access.
- Interior finishes starting before openings are weathertight.
- Lifts or scaffold removed before glazing sealant is complete.
- Field testing scheduled after access is gone, so retests are expensive or impossible.
- Construction damage to installed glass and finishes from welding, grinding, and cleaning.
What to show in the schedule
Show these as separate activities, with logic links between them:
| Activity | Why it needs its own line |
|---|---|
| Air and water barrier complete at openings, by area | Glazing can’t tie in until it is done |
| Submittals issued, reviewed, and approved | Approval releases framing material |
| Dimensions guaranteed, or openings ready to field verify, by area | Fabrication and glass ordering start here |
| Glass and framing delivery, by area | Matches the installation sequence |
| Glazing start and finish, by area | Drives close-in |
| Perimeter sealant | Needs access after the glazing |
| Field water testing | Needs access, and time for retests |
| Lift or scaffold removal | Must follow sealant and testing |
Basis and limits Sequence varies by system and project. The manufacturer’s installation instructions and your project schedule govern.
Chapter 7Shop glazing vs. field glazingField Guide No. 23
Where the glass goes in changes your schedule.
Two ways to glaze
Shop glazing sets the glass into frames or units in the shop. Finished units ship to the job ready to install. Field glazing sets the glass on the building, after the frames are anchored in place.
Sealants and glazing tapes need clean, dry surfaces and the right temperature and humidity to bond and cure. A shop controls all of that. On a jobsite, dust, moisture, wind, and cold work against every joint.
| Shop glazing | Field glazing | |
|---|---|---|
| Conditions | Controlled | Weather-dependent |
| Inspection | At the bench | At the opening |
| Work height | Bench height | Lifts and scaffolds |
| Field crew | Sets finished units | Glazes each opening |
| Unit weight | Heavier units | Lighter frames |
| Glass needed | Earlier, at the shop | Later, at the site |
Neither is better everywhere. The opening decides.
Which systems go where
| System | Where it is usually glazed |
|---|---|
| Unitized curtain wall | Shop glazed by design. Units are built, glazed, and sealed in the shop, then hung on the building. |
| Stick-built curtain wall | Usually glazed in the field, after the mullions are anchored. |
| Storefront | Either. Unit size, site access, and handling decide. |
Structural silicone and shop quality control
Structural silicone glazing bonds the glass to the frame with sealant, so the bond itself carries load. That puts a premium on surface preparation, adhesion testing, and full cure before a unit moves. ASTM C1401, the standard guide for structural sealant glazing, addresses its design and quality control.
| Step | What shop QC covers |
|---|---|
| Prep | Surfaces cleaned and primed where the sealant manufacturer requires it |
| Adhesion | Sealant adhesion tested on project materials, per the manufacturer |
| Cure | Units stay put until the sealant has cured enough to handle |
| Inspection | Glass, seals, and finish checked before each unit ships |
The schedule effect and the trade-offs
With guaranteed dimensions, shop work runs while the openings are built, and finished units are set as soon as openings are ready.
The trade-offs: shop-glazed units are heavier and bulkier. They need a hoisting plan, room to stage, and protection in transit and on site. And the glass has to reach the shop earlier, so opening dimensions have to be locked in earlier.
What it needs from you
| Need | What it means |
|---|---|
| Dimensions | Guaranteed opening dimensions, as early as possible |
| Access | A hoisting plan, crane or lift time, and a clear path to each opening |
| Staging | Laydown space and a delivery sequence that matches the install |
| Protection | Protection for set units through the rest of construction |
Questions worth asking your glazing contractor
- Which openings will be shop glazed, and why?
- What dimensions do you need, and by when?
- How heavy are the largest units, and how will they be set?
- How are units protected in transit and on site?
- What adhesion testing and quality control happen in the shop?
How BCM approaches it
BCM Glass self-performs its fabrication in its own shop. Where the opening allows it, we glaze there too. With guaranteed dimensions, our frames are usually built before the openings are even ready, so the building closes in sooner.
Chapter 8Better glazing RFIsField Guide No. 16
A reviewer who has to decode a question will park it. The faster the issue is clear, the faster the answer comes back, and the less schedule it burns.
Six habits that get faster answers
- One question per RFI, so it can be answered, tracked, and closed on its own.
- Reference the documents: cite the sheet, detail, and spec section so the reader goes straight to the issue.
- Include a picture: a marked-up drawing or a photo often says more than a paragraph.
- Propose a solution. Reviewers can approve a proposal faster than they can design one.
- State the impact: schedule, cost, or both, and the date you need the answer.
- Send it early. Questions caught at bid or submittal cost less than questions found in the field.
A strong RFI and a weak one
| Weak | Strong | |
|---|---|---|
| Subject | “Window question” | “Level 2 storefront head, Sheet A-501, Detail 4” |
| Question | “What should we do?” | “Drawing shows X, spec says Y. We propose Z. Confirm?” |
| Attachments | None | Marked-up detail and a photo |
| Timing | “ASAP” | “Needed before frames and glass are released” |
| Impact | Not stated | Schedule and cost impact stated |
Track and close
- Track every RFI: log the date sent, the date due, the date answered, and the impact. A clean log is your best tool when a delay question comes up.
- Close the loop: when an answer arrives, confirm it, update the drawings or shop drawings, and tell everyone affected.
Basis and limits RFI procedures differ by contract. Follow the process and response times in your project documents.
Chapter 9Tools in this manual
Every tool is free to download, with no sign-up. Use them on any project, with any glazing contractor.
Fillable PDF · Chapter 3
Guaranteed Opening Dimensions Form
Record the dimension basis, tolerances, and signatures so frames can be built and glass ordered without waiting on field verification.
Fillable PDF · Chapter 4
Site Readiness Checklist
Walk the area with the glazing foreman before mobilizing and confirm every readiness item in writing.
Fillable PDF · Chapter 5
Pre-Install Meeting Agenda and Minutes
A ten-item agenda for the glazing scope that doubles as the meeting minutes, with an action item log.
The Glazing Bid Leveling Workbook and the Division 08 Scope Responsibility Matrix are in the Glazing Buyout Manual and the Field Guide Tools library.
Chapter 10The glazing schedule checklist
At award
- Decide whether you will guarantee opening dimensions, by area, and with what tolerances.
- If not, set the date openings will be ready to field verify, by area.
- Agree on the submittal issue date and design-team review time.
- Identify which samples (finish, glass) gate material orders.
In the schedule
- Barrier complete at openings, by area.
- Submittals issued, reviewed, and approved.
- Dimensions guaranteed or verified, by area.
- Glass and framing delivery, glazing start and finish, perimeter sealant, field testing, and lift removal, linked in sequence.
Before mobilization
- Signed Guaranteed Opening Dimensions Form for guaranteed areas.
- Site readiness walk completed and signed, with open items assigned.
- Pre-install meeting held, minutes distributed, action items logged.
During installation
- Field testing scheduled early, while access is in place.
- Installed glass and finishes protected from other trades.
- RFIs tracked, answered, and closed.
Building a glazing schedule?
We’ll help you build the glazing sequence into your schedule from day one. Tell us about the openings early.
Chapter 11Sources and basis
This manual reflects BCM Glass’s practice as a commercial glazing contractor and the standards below. Standards are revised periodically; use the editions the project specifications reference.
- ASTM C1401, standard guide for structural sealant glazing. ASTM International.
- AAMA 503, voluntary specification for field testing of newly installed storefronts, curtain walls, and sloped glazing systems. FGIA.
- ASTM E1105, field determination of water penetration of installed exterior windows, skylights, doors, and curtain walls. ASTM International.
- AAMA 501.2, quality assurance and diagnostic water leakage field check. FGIA.
General guidance only. The contract documents, the project schedule, the manufacturer’s instructions, and the project safety plan govern. Prepared by BCM Glass, Ashland, Virginia. Questions: estimating@bcmglassco.com.